

So you've got your wood, and your paint and some other supplies......
Now you need to figure out what method you are going to use to make your design on your signs.
Today I'm going to talk about making your own stencils. Some of you will hate this post since I'm talking about using a craft cutter, and you can't afford one! But don't worry- I'm going to discuss some other ways to make signs during this week. Some that are even easier!
Don't just skip this post if you don't have a Silhouette or Cricut, though! You can make your own stencils without one if you have patience!
Making a paper stencil without a craft cutter
To make your stencil-
- Make your design on the computer.
- Print it out (use a thicker paper, card stock, etc.).
- Cut it out with an exacto knife (may be tedious, but if you have patience you can get great results!) Keep all the insides of your letters like the o's and e's!
To make your sign-
- Paint the background color on your piece of wood.
- To prevent bleed-under use a slight amount of spray adhesive or lightly apply a glue stick on the back.
- Place the stencil on your wood in desired position- use painters tape on edges to keep it still.
- Don't forget the insides of your letters! Use a glue stick to lightly apply them, enough they will stay, but not too much so you can pull them off!
- Paint inside the stencil to paint your words/design on your sign. It's better to dab the paint than brush it on which will push the paint under the stencil. A foam brush may be better for this job than a bristle one.
- Use the least amount of paint possible! Tap most of the paint off your brush. The less you use, the less likely you'll get paint running under your stencil.
- If you are using spray paint, make sure the rest of the sign is completely covered- if your stencil doesn't completely cover it, use newspaper and painters tape. Spray LIGHTLY! Use more than one coat if necessary. The heavier you spray the more likely you will bleed under.
- Either wait until the paint completely dries, or pull the stencil up immediately

Making your own stencils with a craft cutter
If you've been reading home decor or crafting blogs for any length of time, you've probably heard the words Silhouette or Cricut thrown around a lot! Especially in the last two years! I heard about the Silhouette SO much, that I just had to get one for myself! Even though it can cost around $200, I can tell you now that in one year, my machine MORE than paid for itself in the money I saved making my own cards and gifts! Not even counting the things that I have made and sold! That has made it even more worth it!
I have an older model, which I'm considering replacing soon since the newest edition of the Silhouette- the Cameo- has a lot better features. So if you've waited to get one, you'll get a better one! Around the holidays, there are always tons of great sales. I'll try to post when those are happening so you can get your hands on one! Usually along with the sales are lots of giveaways for a chance to win a machine and lots of stuff to go with it! Just don't buy it direct from their website without a code! You'll pay too much!
This thing can cut paper, vinyl, contact paper, fabric, and the possibilities are endless! See here to learn more about it! There are other cutting machines out there, but I don't have experience with them. You can see a comparison of Silhouette vs Cricut here.

So, maybe you have a craft cutting machine but haven't used it for stencils yet! Let's learn how to make stencils for our sign painting!
Making a sign from your craft cutter stencil
This is how I make most of my signs
To make your stencil using the positive space (the actual letters/design)
- Design your stencil in your machine's software program.
- Cut your design out on vinyl or contact paper. I highly suggest contact paper as it's cheaper and comes in bigger rolls than vinyl! Clear will work, but I buy mine at Target and buy a big roll of white contact paper- it's just like vinyl and costs under $6 for a huge roll vs $10 on a few sheets of vinyl. Clear doesn't always stick as well, especially if you try to move it around. Save your actual vinyl for projects that will be keeping the vinyl on them. You'll throw away your stencils after using them!
- If you use a full sheet of contact paper/vinyl, you don't have to use your mat! Took me awhile to realize that. Your machine should mostly just cut through the vinyl layer and leave the backing intact.
- Remove your negative space from the stencil (the paper that surrounds what you cut out)- leave the letters or design behind.
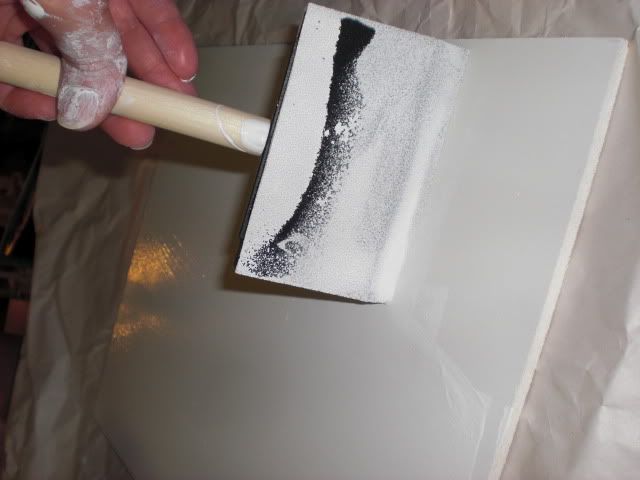
1. Paint your sign the color you want your letters (I'm using a brush and latex paint here just because it's cheaper than spray paint and I hate the cheap white paint).
2. Place your cut out letters or design.....I used to use the transfer paper, but it was just too many steps! For an intricate design, I'll still use it, but for a basic sign, I just lift and place my letters with my exacto knife or tweezers. Vinyl or the white contact paper is easy to move around a little if you don't get things straight.
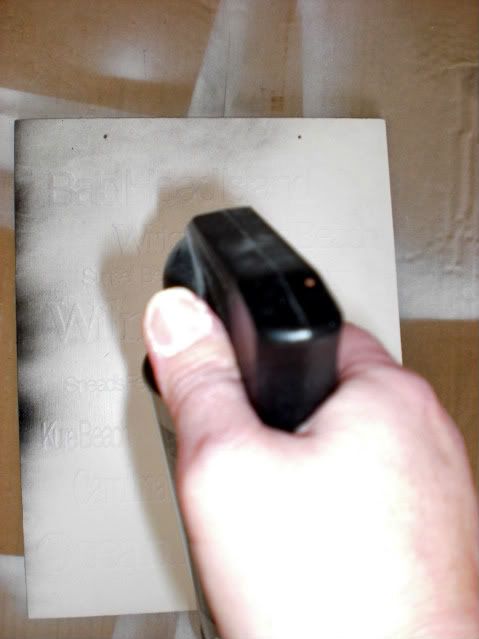
3. Spray paint over your letters and your entire board. Spray lightly, you can always do more than one coat, and you'll probably need more than one coat, especially if you don't plan on distressing. This is your background color! (To be really sure you don't get any bleeding you can paint over the letters first with the color they will be once you peel them off, this can help to seal them!) If you plan to distress, you won't need to put it on as thick, since you'll want to sand some off anyways!
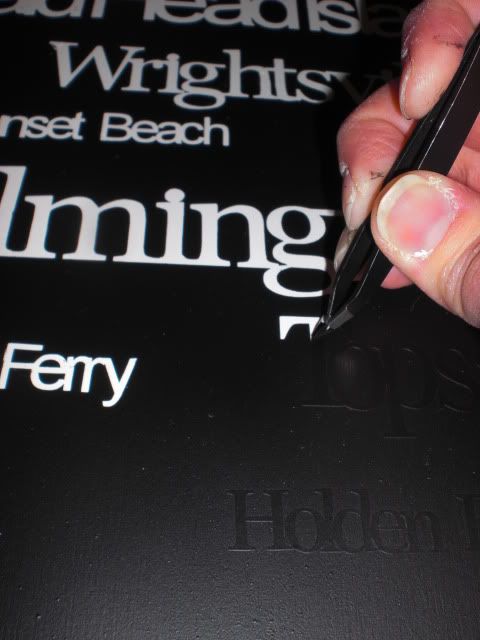
4. Wait for it to dry when you are using the positive space like this! Otherwise you'll be smearing the paint onto the letters. Then pull off the letters carefully with a weeding tool (comes with your machine or sold as an accessory), sharp tweezers, an exacto knife, or even your fingernails if you are doing large letters. For lots of small letters, I definitely recommend using tool, it'll go a lot faster.
5. Flip and spray the back and sides as well if you want. Depends on your preference!
6.Once dry, distress, if desired, with a high grit sandpaper (use a high number, I usually use over 100, too much lower and it'll just look scratched). Hit it in areas it would naturally distress over time, like the edges and a bit across the letters. It's all up to you how much or how little.
7. Here's where you are finished, unless you want to seal it and/or hang it. See supplies for ways to seal your sign. You can use a drill to make holes and string jute, twine, or ribbon through your sign, or you can use sawtooth hangers on the back so you can hang it on a wall.
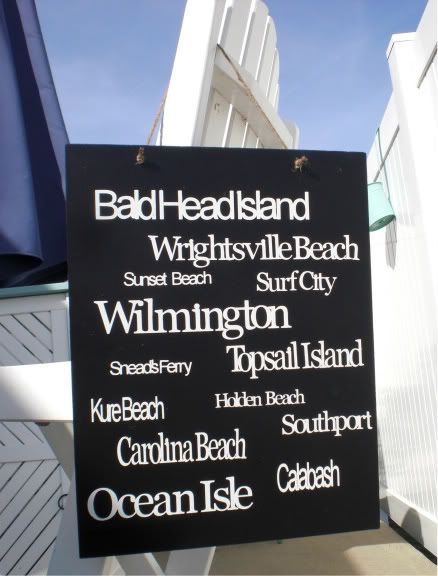
To see more examples of using the positive space, visit these ladies......


To make a sign using the negative space (the space around the letters/design)-
1. You can use just the negative space, or use the leftover negative space from the project above that you just used to make your previous sign.
2. Be sure to hold onto the insides of all the letters (like the o's and e's so that you can finish off those letters!
3. Peel off the stencil, place on your sign, then go back and fill in all the centers of your letters.

4. Infarrantly Creative's Beckie suggests sealing the edges with mod podge on a rough board.
5. Paint with spray paint or dab on as noted in the first tutorial above. As soon as I have my paint on evenly, I usually rip off the stencil immediately if I can do it all in one big movement. This helps prevent the stencil from pushing paint underneath as it dries. Then I usually just leave the insides of the letters until it's dry, so I don't smear the paint under them.

Here, I used the negative space since I needed to paint
two different colors and needed to brush them on. This is a sign I made for a friend.
Hopefully the "negative" vs. "positive" thing makes sense! Remember the negative is the outside, and the positive is the inside- what you are actually cutting!
If you have any questions, or think I should clarify any instructions better please let me know!!
Keep coming back the rest of the week for more sign making methods!
Check out the rest of my 31 days of making wood signs posts:


