Showing posts with label flip-flops. Show all posts

Sunday, October 14, 2012

Day 14- More Beach Signs for Beach Weekend!


Continuing with our beach theme, here are a few more beach signs that I have made……


IMG_2907

Beach house in teal and aqua! Love this on this rough pine board. The teal behind the yellow easily peeks through without any distressing.


11

I thought these “Sail Away” signs would be adorable in a little boys nautical nursery. In fact, I planned on using one if my second was a boy! Since I have two girls though, no nautical nursery here!


12

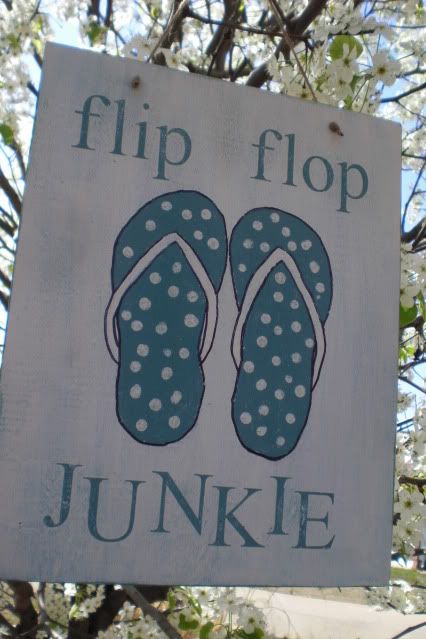
I first made a Flip Flop Junkie sign here, and it was such a popular gift that I decided to make another, smaller one.

I've done several posts in the past on beach signs. Go to this link to see my posts sorted by beach signs. You can see all the posts I've done in the past that are tagged "beach signs."
.
Hope you are enjoying Beach Weekend! One more day to go! (Yes, I realize Monday isn’t the “weekend” but it’s right by it, isn’t it?! I think it counts!)


Check out all of my other 31 days of signs posts here:

Intro
Day 1- Where to find wood
Day 2- Gathering your supplies
Day 3- Making signs using your own stencils
Day 4- Making signs using pre-made stencils
Day 5- Making signs with stickers
Day 6- Making signs free-handed
Day 7- Making signs with stamps
Day 8- Making signs with transfers
Day 9- Print a sign
Day 10- Making signs with cutouts
Day 11- Recap- 8+ ways to make signs
Day 12- Beach Subway Art
Day 13- All You Need is Love and the Beach


I sometimes link up to these lovely ladies' parties:

Funky Junk's Sat Nite Specialshabby creek cottageMy Uncommon Slice of Suburbia
HookingupwithHoH Sew Chatty
Photobucket


Monday, October 8, 2012

Day 8 - Making Signs with Transfers


This is part of my 31 day series on making wood signs. To see the other ways we've discussed making signs already, visit the 31 day introduction page.

Today, I'm going to discuss making signs using transfers. There are a few different ways to do this, but I  have only tried one method, so I'm going to direct you to a few other tutorials so you can get the best idea of how to do signs this way!

Transfers work well when you are doing a more complicated project, that you don't want to spend the time creating a stencil on.


Pencil Transfer Method

I made the flip flop design on this sign by using a pencil transfer method. (Go here to see my original post on this sign!)


I didn't take pictures of the whole process, so I'll see if I can explain!

  1. Print out the words or graphic you want on your sign or hand sketch your design. In this case I hand sketched them (tracing a girl's size flip flop to get a good shape), because I didn't want to mess up the sign with lots of pencil and erase marks!
  2. Trace over the design (printed or sketched) several times, really hard with a pencil (you'll probably want an actual pencil, not a mechanical one to get a good thick line.
  3. Flip the paper over, and lay the traced side down onto your sign.
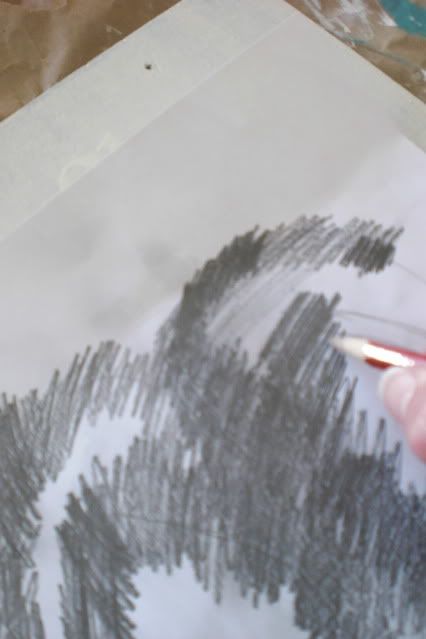
  4. Using your pencil again, rub over the entire design and it will transfer the pencil from the other side onto your design.
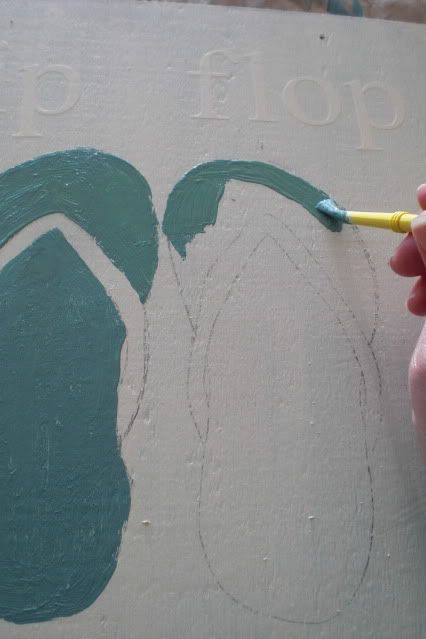
  5. Fill in the lines with paint.
 
Rubbing over the transfer with pencil


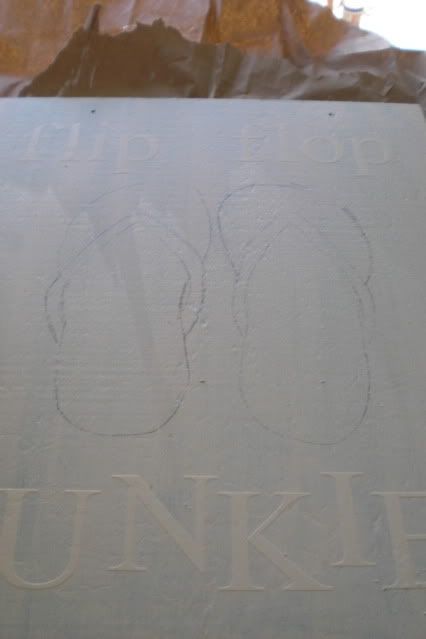
Look closely and you can see the faint lines that were left from the transfer
 
 
Paint to fill in your design
 
 
 Carbon Paper Transfer Method
 
Gina at The Shabby Creek Cottage is the queen of this method! I'm going to send you over to her for detailed instructions but it's sort of on the same lines as above, without having to do the scribbling.
  1. Print out your design on the computer.
  2. Place a piece of carbon paper on your sign and your printed design on top.
  3. Trace over your printed design with something with a sharp point. You could use a pen or pencil. Gina used her daughters DS stylus! Genius!
  4. Remove the paper and carbon paper and your design should now be on your sign.
  5. Paint in the lines to complete your design. (Gina also has a great tutorial on how to more easily fill in your letters/design)
 
 
Technically this tutorial is for a stool, but it's exactly the same as if you were doing on a sign


Wax Paper Transfer Method
 
 
This method requires an ink jet printer, and I've been waiting to purchase ink to try it out! I have a laser printer that I use on a normal basis because the ink is cheaper. The reason you need an ink jet printer is because the ink is more transferable with this printing method.
 
Basically with the wax paper transfer method, you print in REVERSE on wax paper, flip over the design and use something to rub the design off of the paper onto your sign.
 
This method will probably not leave you with a perfect design, but that's the style now! Imperfect and distressed!
 
Check out Unexpected Elegance's instructions on how to use this method. She does a great job of explaining the process- even though she does her's on a pizza peel, the same method can be applied to wood signs!
 
 
Hopefully you are getting some great ideas so far to make your own signs!
 
Go to my 31 day series homepage to see all the posts on sign making (updated each day new posts are added!).
 
Or check out what we've discussed so far!
 

Day 1- Where to find wood


I sometimes link up to these lovely ladies' parties:
 
shabby creek cottage


My Uncommon Slice of Suburbia
Funky Junk's Sat Nite Special
HookingupwithHoH
PhotobucketSew Chatty

Wednesday, March 30, 2011

Flip Flop Beachy Sign

I found this sign recently at TJ Maxx.

Photobucket

I was in love with it, and brought it home for just $6! Not too bad!!

Except I knew my BFF would be in love with it too, and if she lived any closer- she'd probably steal it!

So, having come off of the success of my last sign, I snapped a pic of this one, returned it, and got cracking on TWO of my own! (One for me, one for the BFF!)

I used the same methods as my last sign, using my Silhouette for the letters, but freehanded the flipflops. I probably could've downloaded a flip flop, but I'm trying my hand at some freehanding (haha) so that I can eventually make signs to sell. All that legal mumbo jumbo on the Silhouette site says you can't use their downloads to sell but only to make things for personal use (or to give away!) See, some of us do read that stuff!!

I'd already primed the board and drilled holes to hang when I made the last sign, so I got started painting it with a great teal color (very similar to the original!). I've been having fantastic luck at buying these $.50 little things of oops paint at Home Depot!

Photobucket

Used the Silhouette to make the words, in vinyl so I can peel off later.....

Photobucket


Photobucket

Lightly covered with two coats of a creamy color paint (using what I've got- it's some leftover standard wall paint!). I wanted there to be some brush strokes and for the original color to show through some.

Photobucket


I used the pencil transfer method to get the flip flop outline on the sign- instead of risking messing it up while freehanding on the board. I drew the flip flops, heavily traced it on the other side, and then put the heavily traced side down, and scribbled over the other side, which transfers the heavy line to the board! I even used the same paper again by just tracing a little bit more and scribbling again on the other board!

Photobucket

It leaves a perfect outline that you can paint over!

Photobucket

Filled in with the same teal and cream colors

Photobucket

Used a pencil eraser to make polkadots- didn't worry if I left a few blogs cause I was gonna sand it!

Photobucket

Peeled off the vinyl letters to reveal the teal below, and sanded away!

Photobucket

I thought it needed outlining and tried it out with a sharpie....which looks good far away, but bad up close. I bought a paint pen that I'll be reoutlining with (I only did the sharpie on the one, since it was my "test" one I'm keeping for myself!). Except, I can't find that paint pen anywhere, so I'm going ahead with pics like this!! I also strung some jute through the holes to hang it up! Beautiful spring day (that dissappeared behind a few weeks of cold rain now!), hang it up in gorgeous blooming tree (despite the sneezing that you know will ensue!) and snap lots of pics!

Photobucket


Photobucket


Photobucket


Photobucket


Photobucket

Here's hoping that sun that we got a preview of for a few days will return so I can get more sign making done!!


Linking up at some of these parties!

Check out a brand new party here at Cherry Street Cottage!


Tip Junkie handmade projects My Uncommon Slice of Suburbia Beach Cottage Good Life Wednesdays


HouseofHepworths Transformation Thursday Join  us Saturdays at tatertotsandjello.com for the weekend wrap   up           party!

Funky Junk's Saturday Nite Special