Tuesday, December 14, 2010

Baby Girl's Rossette Wreath


I made this rossette wreath for my kitchen last week, and since I had a few leftover rosettes, I decided to make one for my Baby Girl's bedroom door.

I used a small wicker type wreath from the Dollar Tree and spray painted it black! It's not perfect, but that's ok since you can't see much of it! It was really too cold to be spray painting, and I kept running into the open garage to squirt it a few times and run back in side repeatedly!!

I used the same white and aqua fabric as the last wreath, and some hot pink felt from the Remnant piles at JoAnn's (my new favorite obsession- searching through remnants!).


Photobucket

The snowflakes are also from JoAnn's and cost a $1 for a bag of them, plus smaller ones. The butterflies are $1 ornaments from Walmart! And the Dream ornament was a gift from a friend a few years back so I'm not sure where that came from! I thought it would look cute here!

The snowflakes are felt "stickers" that I'll remove after winter, and I may just leave this up all year round!

Just wish I had some cuter hangers than the Command ones!

Photobucket


You can see my posts about her room here, here, and here to see the progress I'm making and how this matches her room!

To see how I made the rosettes and where I got this idea, see the link in my earlier post about my other wreath!

Linking up to these linky parties (LOVE, LOVE, LOVE browing through linkies for great ideas! That's how I found this one!)


My Uncommon Slice of Suburbia


Friday, December 10, 2010

Fleece Rose Wreath

(Words will be few in this post as one hand is holding a drooling baby!!)

Saw this wreath in a linky party back in October and HAD to make it!!


Ellen makes lots of great wool/felted projects and more! Check her out!

I pretty much followed her great tutorial, free handing the rosettes after I got the hang of it! I used fleece instead bc it was on sale at Hobbly Lobby and was in the colors I wanted! I also squished as many as I could onto the wreath!


Glad I found the Dollar Tree snowflakes at the start of Nov bc they are gone now!


Here's mine:


It's not perfect-my first rosette project, but I looooove it! I looped navy ribbon through the top several times to hang it (those roses are navy also- if they look black to you!!)

It's hanging on my skinny pantry door in the kitchen. Matches my decor so well!

Linking this post to.........


HookingupwithHoH


Join  us Saturdays at tatertotsandjello.com for the weekend wrap up    party!


Wednesday, November 17, 2010

DIY Apothecary Jars

I didn't realize how popular apothecary jars were until I started reading creative/DIY blogs! And I knew I had to get some! However, I wasn't sure I wanted to pay the price I was seeing for them!

Then I came across this project that I mentioned here in an earlier post about my planned projects!


Ashley's Apothecary Jars

I pretty much used all the same supplies from Hobby Lobby that Ashley used here......... (and it just so happened ALL were on sale when I got them- use coupons from the paper or online if they aren't on sale for you!)


(Ashley's pic not mine!)


I didn't take pics of my pieces before but I used all the same supplies except for glass candle sticks from the Dollar Tree instead. I just spray painted them Heirloom White, then black so that a "wood" like color appeared through when I distressed them later!

Check out her tutorial for details on how to DIY this yourself! Like I said all I did different was use the glass candle sticks since they were cheaper (the small ones were 2/$1!), and I spray painted everything instead of using regular paint.


I loooooove this project!!!

I actually finished them quite awhile ago, but Hobby Lobby was out of the finials for awhile, and I only had one!! Now it is finally done!

Only one is filled with "fallish" stuff, so I'll probably replace the pine cones with little Christmas ornaments instead of acorns soon. The other two are filled with wine corks (Yes, USED wine corks, although you can buy just wine corks at craft stores- don't worry that is YEARS worth of wine! Glad I hung onto them!), and beach stones that I've mostly collected at NC beaches on trips there with my BFF.


I have these sitting on the edge of my kitchen counter, that hangs over into the living room, so they almost seem like more of my living room decor than kitchen! (although you can see the knife block back there!)


For now, I have it with a beach sign I got for $5 at Home Goods- on clearance because the clock is broken. I think I may replace it with a picture or something else because the clock is paper and kinda cheap looking if you look close! I liked how the gray of the sign goes with the stones, and it is slightly distressed. I may distress it more, if possible or maybe rub on some blackish stain.

And I found this little set of African spice pots in my storage that I got years ago in West Africa and thought it would look cute here! They sort of have the same rough, distressed look of the jars.


Now, that I'm taking a look at pics of mine and Ashley's together.....I think I used smaller jars! Her finials don't seem to overwhelm the jars as much as mine do! Oh well! I still like it!

And let's be real for a sec.....this is what it looked like before I moved all the crap to take pics! :)


I'd just had company for dinner and used my china at my fall table scape seen here, so there's some dirty china waiting to be washed, an oddly placed telephone (still trying to figure out where to put that! I may just put it away unless needed for power outages, since we have handsets in the bedrooms!), a bucket filled with Baby Girl's bottle parts, on top of a recently purchased cake stand that I still don't know what to do with, and our randomly placed glass fruit bowl that I don't know where to put right now either!

But let's imagine this is all that is there, and it looks gorgeous!


Ahhhhhhhh!


Linking up this project at these lovely linky parties! Visit them for more great inspiration!

HookingupwithHoH

Tuesday, November 16, 2010

Baby Girl's Flowers

Every day, I rock Baby Girl to sleep and see this across from me.......


And I love the shelves I re-did, and love the flower pot, flowers and butterflies from Hobby Lobby (whose colors never show right in pictures, I promise they match well with her bedding!).
But the flowers and butterflies have been bugging me lately! It just needed something to tie it all in! So, as I sat in the rocking chair every day for the past month or so, I thought up this......


At first, I thought about doing green stems and leaves for the flowers, but there is zero green in her room, so I thought up this black vinyl project!


I used black Cricuit vinyl from JoAnn's- at 2 sheets for $9.99 it isn't cheap, but they always put out 40% or 50% coupons in Sunday's paper, to help make it cheaper! I can handle about $6 for this project, which took up less than 1 sheet and some other projects I have in the works!
I don't have a Cricuit cutting machine though (I really want a Sillouhette one!), so I freehanded all of this!


I drew the stems and leaves on the back of the vinyl, cut them out, and placed them over and over and over until I got them right! :) Thank goodness you can do that with vinyl!
I used a chalk marker to write "Watch Me Grow." It can wipe off with a damp cloth, so I can change the words whenever I want!

Oh, and I must confess......I did this....while she was sleeping, over top of her! Yes, I climbed on a step stool and leaned over the crib while she slept through the whole thing! And took pictures while she was sleeping!

See......

Never moved a muscle! She is her father's daughter and can sleep through anything! Normally I wouldn't do a project over top of her, lol, but I knew I'd be interrupted if I did it during the day! So late at night it was!

Now, I can rock in peace with out the wall yelling at me to fix it, and this is my view instead!


One more number to mark off the list of Baby Girl projects! Projects #1, 5, and 11 (this one!) are complete! Eight more to go! Half of the materials for other projects have been gathered, I just have to order some more fabric! Hope these can get done along with all my other projects, PLUS Christmas is about to hit!!

Sharing this project at these linky parties! Visit them for more great ideas and inspiration!


Friday, November 5, 2010

A Month of Thanksgiving!

I'm a little late in writing about this since we are 5 days into November....but what else is new!

Lots of people around the blogosphere, and some of my friends on facebook have been doing posts on what they are thankful for, or doing something each day to give to others.

Last year the hubby and I took up this 30 day giving challenge from Kingdom First Mom!

While we enjoyed it, it was a stressful month for us for lots of other reasons! We were in the middle of moving (which both distracted us, AND helped since I was gathering stuff to give away while packing!), and I was unknowingly pregnant and starting to feel some symptoms.

I thought a lot about it and decided that this year it might be too much with a new baby, but I wanted to do something!

So I came up with this idea-

I'm leaving "Thankful" notes in the hubby's lunch cooler, everyday up til Thanksgiving, then planning to give them all back to him in a scrapbook for his birthday (a week after Thanksgiving!), along with pictures! I'm stealing the old ones back when I put the new ones in!

I've been writing them on plain old computer paper, but cutting them out with fancy scissors and writing nicely, so I can later mount them on scrapbook paper!

It's taking me just a few seconds everyday to write something I am thankful about him, and he has been LOVING it!

(I just now had to shoooo him from the room because he doesn't know about the scrapbook idea, nor does he know I'm planning to put in notes for a few more weeks! Can't have hi, see me writing!!)

They've been little notes that say things like how thankful I am he helps around the house, that he gave me a beautiful daughter, and that he loves me just the way I am! I haven't thought out all of the things I'm going to write yet, but he's such a great hubby I'm sure I won't run out of ideas!

What are your ideas for giving thanks this month?

Even in the midst of chaos, there is always *something* to be thankful for!!

Saturday, October 30, 2010

Updated dining room table decor!

*Disclaimer*- I am not a great picture taker, and even though I tried to tweak them, I don't think the pictures do justice to my decor here, but you get the idea! I promise the blue colors really do match better than they show up!


I've been tweaking my fall decor a bit!

I already knew I wasn't perfectly happy with this........


I really only 
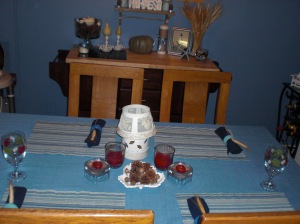
incorprated the red candles because they are my favorite fall scent- apple cinnamon! But they aren't that pretty, nor do they really "match." I threw in the fall goblets that have a bit of the same deep red, to make me feel like it was working......It wasn't!

I was thrilled with my buffet, but not the table or the china hutch!

So I was browsing around on some linky party posts and found this.....


Simcoe Street

Painted white pumpkins with blue candles?? Looooooove! Why didn't I think of using the box of leftover candles from my wedding before now??

I thought I would go find some more pumpkins to paint white.....but I already did that!

Then as I was reading through Jenny's Simcoe Street blog, I found this post where she set her dining room table for a dinner party with her pretty white china and glassware!


*LOVE*

So again I thought, "I have pretty white china! With blue edging!" I'd never considered using it for fall! (Again, I'm sooooo loving this *new to me* concept that fall doesn't have to be about traditional fall colors!!)

So I dusted off some of my hardly used wedding china, added some often used (hehe!) wine glasses (although not as pretty as Jenny's- I wish I'd registered for pretty goblets for my wedding!!), and moved over the pumpkins from the TV stand. (See how I made them here!)

On my TV stand in the living room, they were cute but kinda blah.

But here on the table, they are Taaahh-daaaaaahhh.........
(sorry for the lame rhyming!)


I love my china! I do use it some, but not as much as I should! (Doesn't everyone say that?) I know lots of people don't even register for china anymore, but I knew I wanted some. And I knew exactly what I wanted!


Wedgewood by Vera Wang


I fell in love with this Wedgewood by Vera Wang in Dutchesse Blue immediately! It also matches these adorable Waterford Ballet plates! I'd be displaying those, but I only have 3 :( Can't really blame people for wanting to buy me a whole set of the Blue Dutchesse for $65 versus $35 for one Ballet plate! I must get at least one more!

Waterford Ballet on top of Wedgewood by Vera Wang


View of the entire dining room (click on any pic for a closer view!)..........


Rearranged the buffet just a teeny bit.......


Moved the candle lamp and leaf plate I painted to the hutch, and added some more candles surrounded by Spanish moss.........


Still not sure I'm loving the hutch, but fall might be over before I'm happy with it! :o)

I also have plans to makeover some of the dining room furniture! The buffet (really an island) was purchased for our last home that had cherry cabinets, and it matched perfectly! Now, it doesn't really match and doesn't fit in our current kitchen! I think I'd like to paint it white, but that would be quite an undertaking!

I am also planning to do something to the dining room table! It is my parent's old set that I grew up eating on! It's still pretty good and solid, but I don't love the shade of the wood. I'd love to sand it down and stain it a lighter color to match the china hutch and buffet. I also plan to recover the seats as the cushions are uuuucckkk!

I think this is it for my fall decorating! I may do one more post summarizing it all! Then I have to WAIT until after Thanksgiving to decorate for Christmas!! Accckkk!! I think I may at least have the hubby pull down the boxes soon from the attic so I can at least start on some Christmas projects! We have LOTS of family coming into town this year, and it's Baby Girl's first Christmas, so I want it to be beeeeaaauuuutiiiful!

I am linking up at the following link parties! Check them out for more great inspiration!


Join us Saturdays at tatertotsandjello.com for the weekend wrap up party!


HookingupwithHoH


Friday, October 29, 2010

Shanty Pumpkins!

This was one of the first projects I found in blog-land that I decided to re-create!

Ashley of Shanty2Chic made these adorable pumpkins!


As soon as I saw these, I knew that I was in trouble- the crafty bug had bitten me!

I immediately started searching for other ways to decorate with non-traditional fall colors and came up with some of the other decor you have already seen!

For this project, I already had smaller pumpkins and gourds on hand that I had used before, but never really liked.

Here's a before picture of the little ones- I forgot to take a pic of the big one that I got from the Dollar Tree. It wasn't nearly as ugly, but I'm not an orange fan!


Ewwwwy!
So. Ugly.

I pretty much exactly followed Ashley's Tutorial, so check out her post if you want to know how to do these!

I used exactly what she suggests- Rustoleum's Heirloom White Spray Paint and Ralph Lauren Faux Technique Glaze (that I got tinted in "smoke") from Home Depot, and jute twine from Hobby Lobby.

This project would have been pretty cheap, except that the Ralph cost me at least $15! But I used such a teeeeny amount, that it will be good for many, many, many projects to come! The jute twine was $2.99, then I used a 40% off coupon. I've already used it on another project and have tons left. The spray paint was just under $4, and I already used it up plus more on the many other things I've painted Heirloom White. And the pumpkins cost $1 since I already had the small ones!

Here's how they turned out!


I totally forgot to bookmark the blog where I saw someone else wrap the jute around the middle of the pear-ish shaped gourds! I'd intended to just wrap the stem of those until I saw someone else wrap the centers like I did above. If I come across the blog again, I'll link it up- or if it was you- let me know!!

I thought the big one looked cute with the little "tail," kind of like some of the vine was still attached, so I just left it there!

At first I had them on my TV stand in the living room but then I got inspiration from another blog I've just started reading. The above pictures I just took in a random spot near my computer so that I don't give my next post away yet!

More to come on where they ended up!