Wednesday, October 10, 2012

Day 10- Making a sign with cut-outs


31 days

This is part of my 31 day series on making wood signs. To see the other ways we've discussed making signs already, visit the 31 day introduction page.

_______________________________


I’ve got one last sign making method that I’m going to share! At least I think so! I keep thinking of more! Can’t tell I love them, can you?!

This method is super easy too! I couldn’t exactly think of what to label this type of sign making, so lets just go with cutouts!

Basically it’s taking pre-made words or designs and using them to make your signs. Totally confused? Me too! Cause I just don’t know what to call this! So let me explain!

I found this little wooden cutout at a craft store. Joann’s I think? I’m always at one of the trifecta of craft stores (Michael’s, Hobby Lobby, and Joann’s), and tend to forget where I get what as far as random things like this go.


DSC_0040

It’s got this weird denim-ish pattern on it, not my style. But friends are my style! I picked it up for $1 or less and figured I could use it for several signs!

Here’s what I did with it

1. I took a board I’d already painted white and placed it on top.

DSC_0043


2. I placed it on some newspaper to avoid over-spray and gave it a couple coats (dry time in between!).


DSC_0045


3. I immediately lifted off the letter, trying not to drag it at all so that it didn’t smear underneath.


DSC_0046


4. Sanded it down on the edges and a little bit all over.


DSC_0050


5. Then I added some hot glued alligator clips to hang pictures of….well, friends of course! Kinda blah just all on its own!


DSC_0051


6. Hang on some pictures and you are good to go!


DSC_0055


I also made this sign with a cut out I found at the Dollar Tree:


376958_304788416198959_102189336_n

I no longer have the cut out to show you, but I made this using the same method as above!

Keep your eyes peeled in craft stores, dollar stores, or dollar sections of stores like Target and Walmart for things you can use to make yourself a fast and easy sign!


For more on my 31 days of signs series check out these links…….

Intro
Day 1- Where to find wood
Day 9- Print a sign


  I sometimes link up to these lovely ladies' parties:


       shabby creek cottageMy Uncommon Slice of Suburbia Funky Junk's Sat Nite Special
HookingupwithHoH
  PhotobucketSew Chatty


Tuesday, October 9, 2012

Day 9: Print a sign


31 days


This is part of my 31 day series on making wood signs. To see the other ways we've discussed making signs already, visit the 31 day introduction page.

Don’t want to spend the time working on painting, stenciling, or transferring a sign? Print it out!!
You can develop a photo or print from your home computer and adhere to wood for a “sign” appearance! Super easy!

Here’s one I made for my husband for his first father’s day.


DSC_0004 (2)

It’s easier to read in person and says “Some day I will find my prince, buy my daddy will always be my king.” So sweet of my husband and my oldest little one! I would've liked the words to be bigger, but this totally worked to make a sign in a pinch!

Here’s how to do it:

1. Decide what picture/saying etc. you want to use.

2. Print it out on your home printer or send it to get printed from a photo developer. (I chose 1 hr. printing since I have a laser printer that isn’t great for pics!)

3. Pick out your board and predrill holes for hanging with ribbon, twine ,etc., or nail a saw tooth hanger to the back.

4. Paint your board whatever the background color of your print is. I painted mine black on all sides and at the top (where you’d see around the holes).

5.  If you drilled holes for hanging, line up and hole punch your picture so that you can tie off your twine or ribbon.

4. Spray your picture with spray adhesive if it’s a printed photo, and if you use a printed picture you can mod podge the board, then lay down your picture and smooth out air bubbles.

5. Thread your twine or ribbon, or just pound a nail in the wall and display!


The Winthrop Chronicles did an awesome tutorial on how she made this Baby Stats Subway art, just by printing and mod podging.  Hop over to see how she did it!

I really thought this was an actual painted sign when I saw it!


Go to my 31 day series homepage to see all the posts on sign making (updated each day new posts are added!).

Or check out what we've discussed so far!


Day 1- Where to find wood


I sometimes link up to these lovely ladies' parties:
shabby creek cottage


My Uncommon Slice of Suburbia
Funky Junk's Sat Nite Special
HookingupwithHoH
PhotobucketSew Chatty

Monday, October 8, 2012

Day 8 - Making Signs with Transfers


This is part of my 31 day series on making wood signs. To see the other ways we've discussed making signs already, visit the 31 day introduction page.

Today, I'm going to discuss making signs using transfers. There are a few different ways to do this, but I  have only tried one method, so I'm going to direct you to a few other tutorials so you can get the best idea of how to do signs this way!

Transfers work well when you are doing a more complicated project, that you don't want to spend the time creating a stencil on.


Pencil Transfer Method

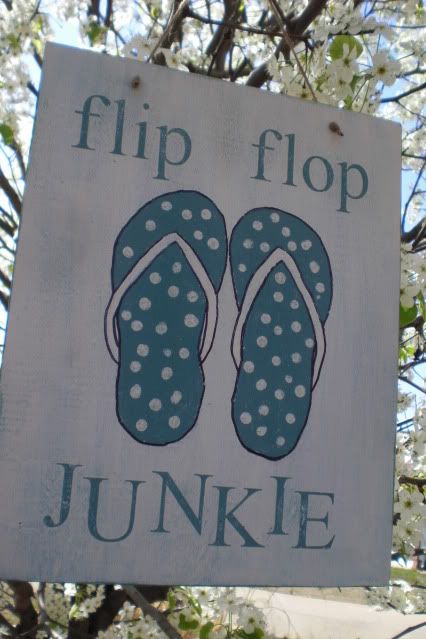
I made the flip flop design on this sign by using a pencil transfer method. (Go here to see my original post on this sign!)


I didn't take pictures of the whole process, so I'll see if I can explain!

  1. Print out the words or graphic you want on your sign or hand sketch your design. In this case I hand sketched them (tracing a girl's size flip flop to get a good shape), because I didn't want to mess up the sign with lots of pencil and erase marks!
  2. Trace over the design (printed or sketched) several times, really hard with a pencil (you'll probably want an actual pencil, not a mechanical one to get a good thick line.
  3. Flip the paper over, and lay the traced side down onto your sign.
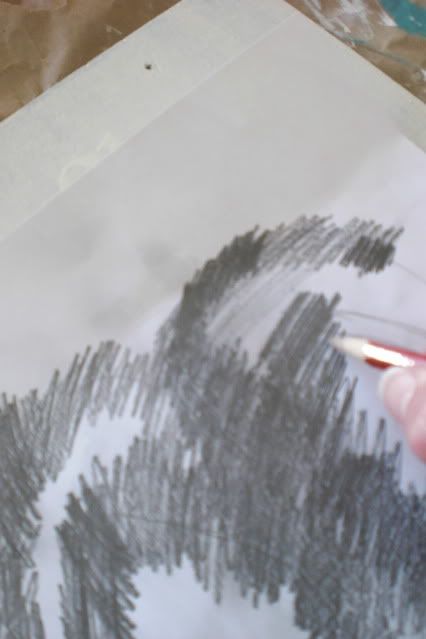
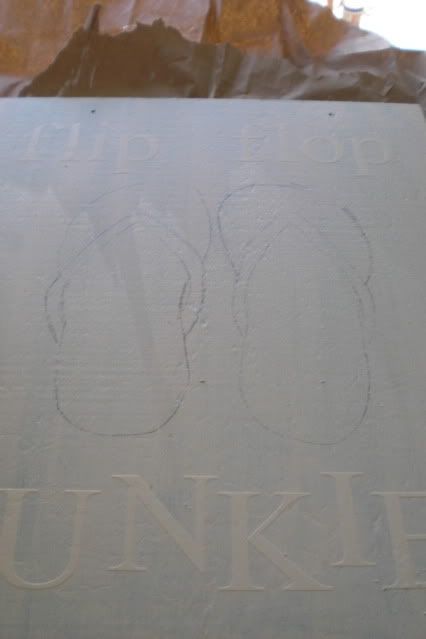
  4. Using your pencil again, rub over the entire design and it will transfer the pencil from the other side onto your design.
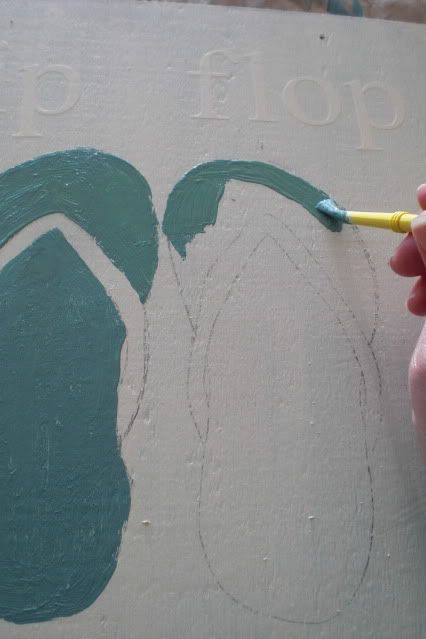
  5. Fill in the lines with paint.
 
Rubbing over the transfer with pencil


Look closely and you can see the faint lines that were left from the transfer
 
 
Paint to fill in your design
 
 
 Carbon Paper Transfer Method
 
Gina at The Shabby Creek Cottage is the queen of this method! I'm going to send you over to her for detailed instructions but it's sort of on the same lines as above, without having to do the scribbling.
  1. Print out your design on the computer.
  2. Place a piece of carbon paper on your sign and your printed design on top.
  3. Trace over your printed design with something with a sharp point. You could use a pen or pencil. Gina used her daughters DS stylus! Genius!
  4. Remove the paper and carbon paper and your design should now be on your sign.
  5. Paint in the lines to complete your design. (Gina also has a great tutorial on how to more easily fill in your letters/design)
 
 
Technically this tutorial is for a stool, but it's exactly the same as if you were doing on a sign


Wax Paper Transfer Method
 
 
This method requires an ink jet printer, and I've been waiting to purchase ink to try it out! I have a laser printer that I use on a normal basis because the ink is cheaper. The reason you need an ink jet printer is because the ink is more transferable with this printing method.
 
Basically with the wax paper transfer method, you print in REVERSE on wax paper, flip over the design and use something to rub the design off of the paper onto your sign.
 
This method will probably not leave you with a perfect design, but that's the style now! Imperfect and distressed!
 
Check out Unexpected Elegance's instructions on how to use this method. She does a great job of explaining the process- even though she does her's on a pizza peel, the same method can be applied to wood signs!
 
 
Hopefully you are getting some great ideas so far to make your own signs!
 
Go to my 31 day series homepage to see all the posts on sign making (updated each day new posts are added!).
 
Or check out what we've discussed so far!
 

Day 1- Where to find wood


I sometimes link up to these lovely ladies' parties:
 
shabby creek cottage


My Uncommon Slice of Suburbia
Funky Junk's Sat Nite Special
HookingupwithHoH
PhotobucketSew Chatty

Sunday, October 7, 2012

Day 7- Making signs with stamps


We've covered where to find your wood, supplies, making signs with your own or pre-made stencils, making signs with stickers and making them free-handed.

Today's method is making signs with stamps.

I purchased this set of stamps from Joann's with a 40% off coupon, so they really didn't cost that much. Stamps are great for making gift tags, scrapbooking, all kinds of other ideas, and of course signs as we'll discuss today!


Can't help sharing these cute little ones too....I haven't even used them yet, but plan to. Maybe for gift tags for Christmas?


I had this idea for a sign for my husband for his birthday, which is 15 days before Christmas. He absolutely looooooves this song. I used to think it was annoying, but he started last year playing it for our then one-year-old, and she loved it too. It's the "la, la, la, la, la" part that got to me, but she made it cute by trying to sing it! So it grew on me.  He loves it soooo much that I knew he would love a sign with the words on it!


And I realized it had some really great words about the beach, and Christmas....and well those are two of my favorite things soooo I came up with this sign.....


I painted the background white, then just dabbed various blues in streaks across it to come up with a snowy, beachy look!


Then I dipped my stamps in navy paint and stamped the words on. I didn't care if it wasn't perfect.


It hangs on the wall during the winter with a painting we got on our honeymoon in Costa Rica, and some beach subway art I'll be showing you later this week!


Check out all the other posts in my 31 day series on making signs.


Day 1- Where to find wood


I sometimes link up to these lovely ladies' parties:
shabby creek cottage
Photobucket


Saturday, October 6, 2012

Day 6- Making signs free-handed


We've covered where to find your wood, supplies,  making signs with your own or pre-made stencils, and making signs with stickers.

Today, I'm going to quickly cover free-handing signs, since this is pretty self-explanatory!

Here's a couple signs I've done free handed


Yes, these signs look sort of rudimentary, but that's the point! It looks like someone threw up a sign to sell their fresh eggs or to point you to their house on the lake!

I did these on very rough fence boards.

I painted them with an oops stain, even though the color of the boards was already pretty similar to this....I just wanted them to look a bit more weathered.

Then I sketched/spaced out the letters with pencil, and then just went for it with a thin brush, and some slightly thinned paint.

If you hate it, you can always paint back over with your base color!\

Honestly, these look a lot better in person than in the pics, in my opinion! They also sort of look like chalk signs! I even had someone at a sale worry that their son was going to erase the Lake House sign when he picked it up!

Personally, I think I have terrible handwriting (I even cried in 3rd grade when I got my first B ever in handwriting class!! Ha!), and yet even I was brave enough to give free-handing a go!!

I'm all about learning different techniques, and sometimes the most basic even works out!

I'd love to see if you have ever given free-handing a sign a go!! Post a link in the comments!


Check out all the other posts in my 31 day series on making signs.

 
Day 1- Where to find wood


I sometimes link up to these lovely ladies' parties:

shabby creek cottage
IhookedupwithHoHlamespicePhotobucket